Documentation
Upload files with jqxFileUpload to PHP service
In this help topic you will learn how to use the jqxFileUpload control using a PHP page hosted on a XAMPP local server.
1. Download and install XAMPP
In this tutorial, we will be using XAMPP for Windows 5.5.27.
You can get it from here: https://www.apachefriends.org/download.html.
For more information on how to properly install and configure XAMPP please refer to XAMPP documentation and FAQ, links for which are available on the download page.
2. Launch XAMPP and start the apache web Server
- In your XAMPP install directory (let's assume c:\xampp\) you should see xampp-control.exe:
When you run it you should see something like this: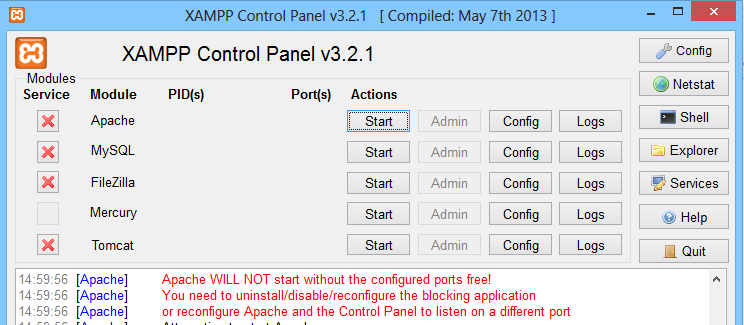
- Select Start for the Apache server. If it started it should look like this:
 Note: On the screenshot you can see that we are using port 2080. The default port is 80, if you want to change it you can do so by pressing config -> Apache (httpd.conf), and editing the "Listen" line.
3. Create your php server file
By default the location your web server is storing its files is /xampp/htdocs
Create a new PHP file in that folder and call it imageUpload.php
Here is an example for the PHP file contents:
<?php$target_dir = "uploads/";$target_file = $target_dir . basename($_FILES["fileToUpload"]["name"]);$uploadOk = 1;$imageFileType = pathinfo($target_file,PATHINFO_EXTENSION);// Check if image file is a actual image or fake imageif(isset($_POST["submit"])) { $check = getimagesize($_FILES["fileToUpload"]["tmp_name"]); if($check !== false) { echo "File is an image - " . $check["mime"] . "."; $uploadOk = 1; } else { echo "File is not an image."; $uploadOk = 0; }}// Check if file already existsif (file_exists($target_file)) { echo "Sorry, file already exists."; $uploadOk = 0;}// Check file sizeif ($_FILES["fileToUpload"]["size"] > 500000) { echo "Sorry, your file is too large."; $uploadOk = 0;}// Allow certain file formatsif($imageFileType != "jpg" && $imageFileType != "png" && $imageFileType != "jpeg"&& $imageFileType != "gif" ) { echo "Sorry, only JPG, JPEG, PNG & GIF files are allowed."; $uploadOk = 0;}// Check if $uploadOk is set to 0 by an errorif ($uploadOk == 0) { echo "Sorry, your file was not uploaded.";// if everything is ok, try to upload file} else { if (move_uploaded_file($_FILES["fileToUpload"]["tmp_name"], $target_file)) { echo "The file ". basename( $_FILES["fileToUpload"]["name"]). " has been uploaded."; } else { echo "Sorry, there was an error uploading your file."; }}?>
Note: Make sure to create the uploads folder inside your htdocs folder, or to change the destination for the uploads to an existing folder on your computer.
4. Creare your HTML page using jqxFileUpload widget.
Create two folders in htdocs folder - scripts
and jqwidgets. Include in them all (or only the necessary) jQWidgets files
- the scripts (including jqxcore.js and the specific widget files
jqxbuttons.js and jqxFileUpload.js) in jqwidgets and the stylesheets
(jqx.base.css and any themes and associated images) in
jqwidgets/styles. Remember to include a version of jQuery in scripts folder, too.
Create a new HTML file in the htdocs folder as the php script, let's call it fileUploadDemo.html
The file should look like this:<!DOCTYPE html><html lang="en"><head> <title id="Description">jqxFileUpload with php example.</title> <link type="text/css" rel="Stylesheet" href="jqwidgets/styles/jqx.base.css" /> <script type="text/javascript" src="scripts/jquery-1.11.1.min.js"></script> <script type="text/javascript" src="jqwidgets/jqxcore.js"></script> <script type="text/javascript" src="jqwidgets/jqxbuttons.js"></script> <script type="text/javascript" src="jqwidgets/jqxfileupload.js"></script> <script type="text/javascript"> $(document).ready(function () { $('#jqxFileUpload').jqxFileUpload({ width: 300, accept: 'image/*', uploadUrl: '/imageUpload.php', fileInputName: 'fileToUpload' }); $('#jqxFileUpload').on('uploadEnd', function (event) { var args = event.args; var fileName = args.file; var serverResponse = args.response; // Your code here. console.log(args); console.log(fileName); console.log(serverResponse); }); }); </script><script async src="https://www.googletagmanager.com/gtag/js?id=G-2FX5PV9DNT"></script><script>window.dataLayer = window.dataLayer || [];function gtag(){dataLayer.push(arguments);}gtag('js', new Date());gtag('config', 'G-2FX5PV9DNT');</script></head><body> <div id="jqxFileUpload"> </div> <br /></body></html>
Note: the uploadUrl parameter is pointing to the php file we've created earlier.
5. Test your web page.
Open up your web browser and browse to http://localhost/fileUploadDemo.html (assuming you didn't configure another port and used the given filenames).