Upload files with jqxFileUpload to JSP servlet
In this help topic you will learn how to create a simple Dynamic Web Application using the Eclipse IDE and the Apache Tomcat server implementing jqxFileUpload widget example in the Java environment.
1. Create a New Project in Eclipse
In this help topic, we will be using Eclipse IDE for Java EE Developers, version Luna. You can get it from here: https://www.eclipse.org/downloads/packages/eclipse-ide-java-ee-developers/lunasr2. Run Eclipse and go to File → New → Dynamic Web Project. In the window that appears, type the project's name (we will name it "JqxFileUpload") and click Finish.
2. Add Necessary Classes to the Java Build Path
Several Java class packages (.jar files) are necessary for the following
example and have to be included in the Java build path. These are:
commons-fileupload-1.3.1.jar- The Commons FileUpload package makes it easy to add robust, high-performance, file upload capability to your servlets and web applications. FileUpload parses HTTP requests which conform to RFC 1867, "Form-based File Upload in HTML". That is, if an HTTP request is submitted using the POST method, and with a content type of "multipart/form-data", then FileUpload can parse that request, and make the results available in a manner easily used by the caller.commons-io-2.4.jar- Commons io library is required by the commons-fileupload library to work.
Here is how to add these to the Eclipse project:
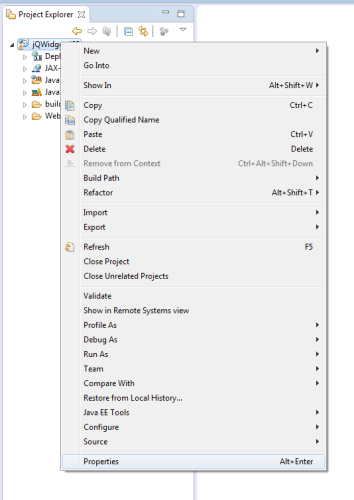
- Right-click on the project and click Properties:
- Select Java Build Path on the left and then the Libraries
tab:
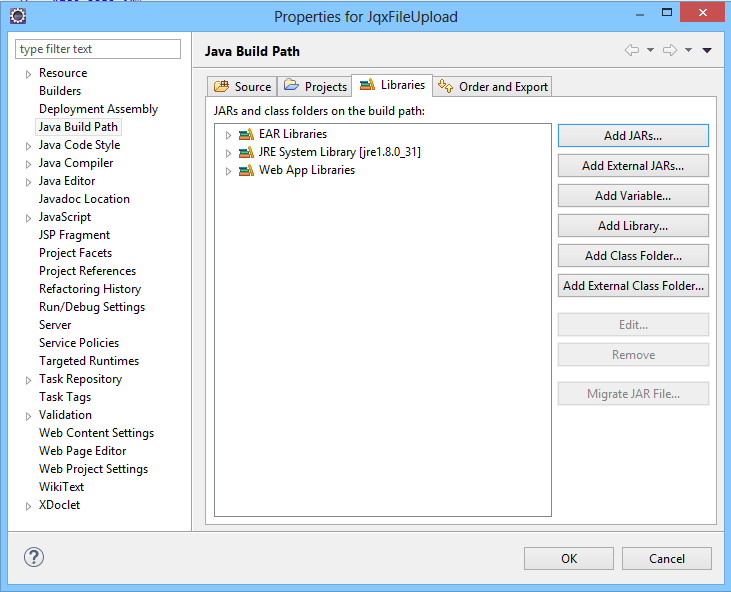
- Click Add External JARs... and browse for the aforementioned files. Note: in this case, the Java Runtime Environment classes are already present in JRE System Library and we do not need to include them again.
The added JARs should appear in Java Resources\Libraries and be ready
for use:

4. Configure the Apache Tomcat Server
Apache Tomcat is an open source software implementation of the Java Servlet and JavaServer Pages technologies. We will be using Tomcat 8.0 in this tutorial. If you do not already have Apache Tomcat on your system, download it from here: http://tomcat.apache.org/download-80.cgi and install it. Then:
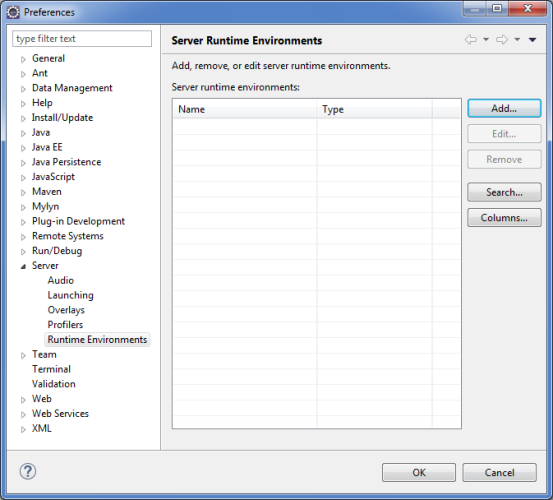
- In Eclipse, go to Window → Preferences. Choose
Server → Runtime Environments on the left:
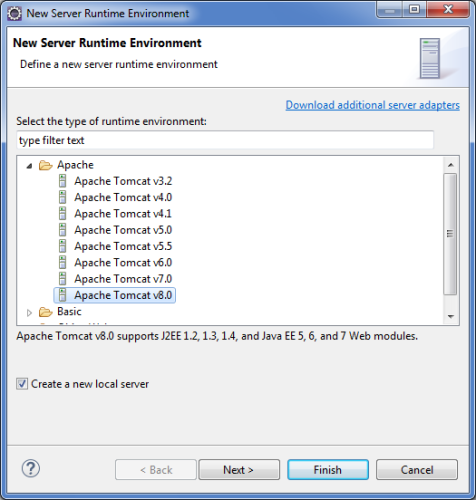
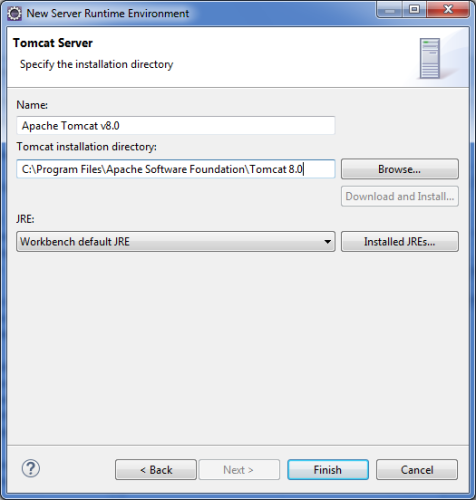
- Click Add. In the window that appears, choose Apache Tomcat
v8.0 and check Create a new local server:
- Click Next, browse for the Tomcat installation directory,
then click Finish and OK in the previous window:
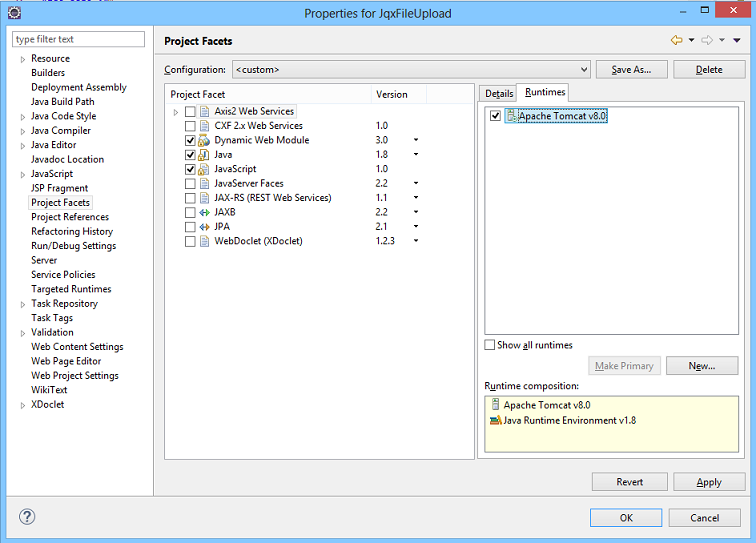
- Right-click the project and choose Properties. In the Properties
window, select Project Facets on the left and then the tab Runtimes on the right. Check Apache Tomcat v8.0. Finally,
click Apply.
5. Add the external jar files to the Deployment Assembly
- Still in the project Properties window choose
Deployment Assembly on the left:

- Click Add. In the window that appears, choose Java Build Path Entries
and select next.

- You should see our jar files:
commons-fileupload-1.3.1.jar
commons-io-2.4.jar
Select them both and press Finish. Then press Apply and Ok on the Properties window.
6. Create a servlet to handle the file upload server side.
- Right click on the project and select New -> Servlet
- Give it a name FileUploadHandler and click Finish.
- Use the following code for the servlet:
import java.io.File;import java.io.IOException;import java.util.List;import javax.servlet.ServletContext;import javax.servlet.ServletException;import javax.servlet.http.HttpServlet;import javax.servlet.http.HttpServletRequest;import javax.servlet.http.HttpServletResponse;import org.apache.commons.fileupload.FileItem;import org.apache.commons.fileupload.disk.DiskFileItemFactory;import org.apache.commons.fileupload.servlet.ServletFileUpload;public class FileUploadHandler extends HttpServlet { @Override protected void doPost(HttpServletRequest request, HttpServletResponse response) throws ServletException, IOException { ServletContext context = request.getSession().getServletContext(); String UPLOAD_DIRECTORY = context.getInitParameter("file-upload"); String resp = ""; //process only if its multipart content if(ServletFileUpload.isMultipartContent(request)){ try { List<FileItem> multiparts = new ServletFileUpload( new DiskFileItemFactory()).parseRequest(request); for(FileItem item : multiparts){ if(!item.isFormField()){ String mimeType = getServletContext().getMimeType(item.getName()); String name = new File(item.getName()).getName(); if (!mimeType.startsWith("image")) { // check if file is an image resp = ("File is not an image!"); break; } else if (!(name.toLowerCase().endsWith(".jpg") || name.toLowerCase().endsWith(".gif") || name.toLowerCase().endsWith(".bmp") || name.toLowerCase().endsWith(".jpeg") || name.toLowerCase().endsWith(".png"))) { // check if file extension is allowed resp = "Upload failed! Only .gif .jpg .jpeg .png and .bmp are allowed!"; break; } else if (new File(UPLOAD_DIRECTORY + File.separator + name).exists()) { // check if file already exists. resp = "Upload failed! File already exists!"; } else { item.write( new File(UPLOAD_DIRECTORY + File.separator + name)); } } } if(resp == "") { //File uploaded successfully resp = "File was uploaded successfully"; } } catch (Exception ex) { resp = "File Upload Failed due to: " + ex; } } else { request.setAttribute("message", "Sorry this Servlet only handles file upload request"); } response.setContentType("text/html; charset=UTF-8"); response.getWriter().write(resp); } }
This servlet will be responsible for the post requests sent by our client page. It is configured to accept image mime types, and only with extensions .jpg, .jpeg, .bmp, .png and .gif. It works for single and multiple uploads since jqxFileUpload sends the files one by one.


7. Create a web.xml config file.
- Expand the WebContent folder and right click on WEB-INF and select New -> File . Name it web.xml and click finish.
- Open the web.xml file and add the following configuration:
<?xml version="1.0" encoding="UTF-8"?><web-app xmlns:xsi="http://www.w3.org/2001/XMLSchema-instance" xmlns="http://java.sun.com/xml/ns/javaee" xsi:schemaLocation="http://java.sun.com/xml/ns/javaee http://java.sun.com/xml/ns/javaee/web-app_2_5.xsd" version="2.5"> <context-param> <description>Location to store uploaded file</description> <param-name>file-upload</param-name> <param-value>c:\Uploads</param-value> </context-param> <servlet> <servlet-name>FileUploadHandler</servlet-name> <servlet-class>FileUploadHandler</servlet-class> </servlet> <servlet-mapping> <servlet-name>FileUploadHandler</servlet-name> <url-pattern>/upload</url-pattern> </servlet-mapping> <welcome-file-list> <welcome-file>index.jsp</welcome-file> </welcome-file-list></web-app>
<param-value>c:\uploads\<param-value>
8. Create your page that will use jqxFileUpload widget.
- Add the Necessary jQWidgets Scripts and Stylesheets to the Project
Create two folders in the project folder
WebContent-jsandcss. Include in them all (or only the necessary) jQWidgets files - the scripts (includingjqxcore.jsand the specific widget files jqxbuttons.js and jqxFileUpload.js) injsand the stylesheets (jqx.base.cssand any themes and associated images) incss. Remember to include a version of jQuery injs, too. - In the WebContent dir add a new
.jspfile. We'll call it index.jsp
Here is how the file would look like:<%@ page language="java" contentType="text/html; charset=ISO-8859-1" pageEncoding="ISO-8859-1"%><!DOCTYPE html PUBLIC "-//W3C//DTD HTML 4.01 Transitional//EN" "http://www.w3.org/TR/html4/loose.dtd"><html><head><meta http-equiv="Content-Type" content="text/html; charset=ISO-8859-1"><title>Java servlet fileUpload demo</title> <link type="text/css" rel="Stylesheet" href="css/jqx.base.css" /> <script type="text/javascript" src="js/jquery-1.11.1.min.js"></script> <script type="text/javascript" src="js/jqxcore.js"></script> <script type="text/javascript" src="js/jqxbuttons.js"></script> <script type="text/javascript" src="js/jqxfileupload.js"></script><script async src="https://www.googletagmanager.com/gtag/js?id=G-2FX5PV9DNT"></script><script>window.dataLayer = window.dataLayer || [];function gtag(){dataLayer.push(arguments);}gtag('js', new Date());gtag('config', 'G-2FX5PV9DNT');</script></head><body> <div id="jqxFileUpload"> </div> <br /> <script type="text/javascript"> $(document).ready(function () { $('#jqxFileUpload').jqxFileUpload({ width: 300, accept: 'image/*', uploadUrl: 'upload', fileInputName: 'fileToUpload' }); $('#jqxFileUpload').on('uploadEnd', function (event) { var args = event.args; var fileName = args.file; var serverResponse = args.response; // Your code here. console.log(args); console.log(fileName); console.log(serverResponse); }); }); </script></body></html>
Note: the uploadUrl parameter is pointing to the value specified for <url-pattern> in web.xml in the <servlet-mapping> section.