Documentation
Bind jqxGrid to MySQL Database Using JSF (JavaServer Faces)
In this tutorial you will learn how to bind a jqxGrid to a MySQL database using JSF (JavaServer Faces), a technology which simplifies building user interfaces for JavaServer applications.
1. Set Up a Database
Our goal is to populate a jqxGrid from a MySQL database. In the example presented here, we will be using the Northwind database. To learn how to set it up, please follow Step 1 from the help topic Configure MySQL, Eclipse and Tomcat for Use with jQWidgets.
2. Create a New Project in Eclipse
In this tutorial, we will be using Eclipse IDE for Java EE Developers, version Luna.
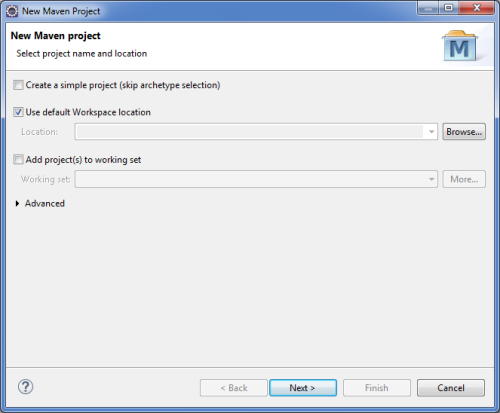
- Go to File → New → Maven Project.
- In the New Maven Project window, make sure Create a simple
project (skip archetype selection) is unchecked and click Next.
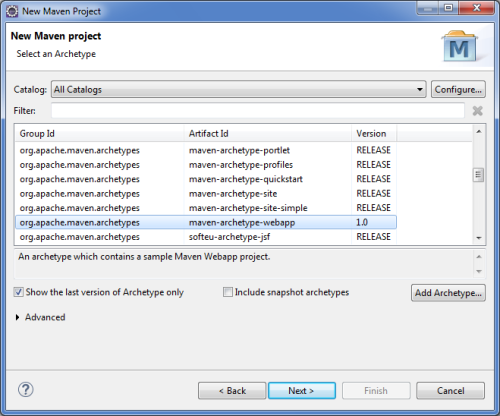
- In the next window, click Add Archetype... and set Archetype
Group Id to org.apache.maven.archetypes, Archetype Artifact
Id to maven-archetype-webapp and Archetype Version
to 1.0. Then click OK.

- Select the newly added archetype and click Next.
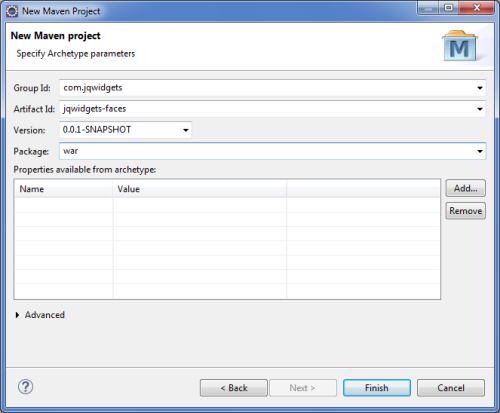
- In the final window of the new project setup, set the Group Id
to com.jqwidgets, the Artifact Id to jqwidgets-faces
and the Package to war. Finally, click Finish.
3. Configure the Project
Add the necessary project dependencies and plugins in the file pom.xml
in the root of the project:
<project xmlns="http://maven.apache.org/POM/4.0.0" xmlns:xsi="http://www.w3.org/2001/XMLSchema-instance" xsi:schemaLocation="http://maven.apache.org/POM/4.0.0 http://maven.apache.org/maven-v4_0_0.xsd"> <modelVersion>4.0.0</modelVersion> <groupId>com.jqwidgets</groupId> <artifactId>jqwidgets-faces</artifactId> <packaging>war</packaging> <version>0.0.1-SNAPSHOT</version> <name>jqwidgets-faces Maven Webapp</name> <url>http://maven.apache.org</url> <dependencies> <dependency> <groupId>junit</groupId> <artifactId>junit</artifactId> <version>3.8.1</version> <scope>test</scope> </dependency> <dependency> <groupId>com.sun.faces</groupId> <artifactId>jsf-api</artifactId> <version>2.1.7</version> </dependency> <dependency> <groupId>com.sun.faces</groupId> <artifactId>jsf-impl</artifactId> <version>2.1.7</version> </dependency> <dependency> <groupId>javax.servlet</groupId> <artifactId>jstl</artifactId> <version>1.2</version> </dependency> </dependencies> <build> <finalName>jqwidgets-faces</finalName> <plugins> <plugin> <groupId>org.apache.maven.plugins</groupId> <artifactId>maven-compiler-plugin</artifactId> <version>2.3.1</version> <configuration> <source>1.6</source> <target>1.6</target> </configuration> </plugin> <plugin> <artifactId>maven-resources-plugin</artifactId> <version>2.6</version> <executions> <execution> <id>copy-resources</id> <phase>validate</phase> <goals> <goal>copy-resources</goal> </goals> <configuration> <outputDirectory>${basedir}/target/jqwidgets-faces/resources </outputDirectory> <resources> <resource> <directory>src/main/resources</directory> <filtering>true</filtering> </resource> </resources> </configuration> </execution> </executions> </plugin> </plugins> </build></project>
The file web.xml, found in src\main\webapp\WEB-INF, defines
everything about the application that the server needs to know. Configure it as
follows:
<?xml version="1.0" encoding="UTF-8"?><web-app id="WebApp_ID" version="2.5" xmlns="http://java.sun.com/xml/ns/javaee" xmlns:xsi="http://www.w3.org/2001/XMLSchema-instance" xsi:schemaLocation="http://java.sun.com/xml/ns/javaee http://java.sun.com/xml/ns/javaee/web-app_2_5.xsd"> <display-name>Archetype Created Web Application</display-name> <servlet> <servlet-name>Faces Servlet</servlet-name> <servlet-class>javax.faces.webapp.FacesServlet</servlet-class> <load-on-startup>1</load-on-startup> </servlet> <servlet-mapping> <servlet-name>Faces Servlet</servlet-name> <url-pattern>/faces/*</url-pattern> </servlet-mapping> <servlet-mapping> <servlet-name>Faces Servlet</servlet-name> <url-pattern>*.jsf</url-pattern> </servlet-mapping> <servlet-mapping> <servlet-name>Faces Servlet</servlet-name> <url-pattern>*.faces</url-pattern> </servlet-mapping> <servlet-mapping> <servlet-name>Faces Servlet</servlet-name> <url-pattern>*.xhtml</url-pattern> </servlet-mapping> <welcome-file-list> <welcome-file>/index.jsp</welcome-file> </welcome-file-list></web-app>
4. Create the Managed Bean
The Managed Bean (which acts as a Controller) will retrieve employee data from the
database, format it as a JSON string and return it to the View (Step 5).
Create a new class, EmployeeController in the package com.jqwidgets
with the following content:
package com.jqwidgets;import java.io.Serializable;import javax.faces.bean.ManagedBean;import javax.faces.bean.SessionScoped;import java.sql.*;@ManagedBean(name = "employeeController", eager = true)@SessionScopedpublic class EmployeeController implements Serializable { private static final long serialVersionUID = 1L; public String getEmployeesString() { String employeesString = "["; try { // database connection // "jdbc:mysql://localhost:3306/northwind" - the database url of the form jdbc:subprotocol:subname // "root" - the database user on whose behalf the connection is being made // "abcd" - the user's password Connection dbConnection = DriverManager.getConnection( "jdbc:mysql://localhost:3306/northwind", "root", "abcd"); // retrieve necessary records from database Statement getFromDb = dbConnection.createStatement(); ResultSet employees = getFromDb .executeQuery("SELECT EmployeeID, FirstName, LastName, Title, BirthDate FROM employees"); // populate an ArrayList with the retrieved data while (employees.next()) { employeesString += "{ \"employeeID\": \"" + employees.getString("EmployeeID") + "\", \"firstName\": \"" + employees.getString("FirstName") + "\", \"lastName\": \"" + employees.getString("LastName") + "\", \"title\": \"" + employees.getString("Title") + "\", \"birthDate\": \"" + employees.getString("birthDate") + "\" }, "; } employeesString = employeesString.substring(0, employeesString.length() - 2); employeesString += "]"; } catch (SQLException e) { e.printStackTrace(); } return employeesString; }}
5. Add the Necessary jQWidgets Scripts and Stylesheets to the Project
Create a resources folder in src\main\webapp and in it
add two more folders - js and css. Include in them all
(or only the necessary) jQWidgets files - the scripts (including jqxcore.js
and the specific widget files) in js and the stylesheets (jqx.base.css
and any themes and associated images) in css. Remember to include a
version of jQuery in js, too.
6. Create the View
The View is where the jqxGrid with the employee data will be displayed. Create a
new XHTML Page in src\main\webapp\WEB-INF and name
it grid.xhtml. This page will serve as the View. Here is its content:
<!DOCTYPE html><html lang="en" xmlns="http://www.w3.org/1999/xhtml" xmlns:f="http://java.sun.com/jsf/core" xmlns:h="http://java.sun.com/jsf/html"><h:head> <title>This example shows jqxGrid binding to MySQL using JSF.</title> <h:outputStylesheet name="css/jqx.base.css" /> <h:outputStylesheet name="css/jqx.arctic.css" /> <h:outputScript name="js/jquery.js" /> <h:outputScript name="js/jqxcore.js" /> <h:outputScript name="js/jqxbuttons.js" /> <h:outputScript name="js/jqxdata.js" /> <h:outputScript name="js/jqxscrollbar.js" /> <h:outputScript name="js/jqxmenu.js" /> <h:outputScript name="js/jqxcheckbox.js" /> <h:outputScript name="js/jqxlistbox.js" /> <h:outputScript name="js/jqxdropdownlist.js" /> <h:outputScript name="js/jqxgrid.js" /> <h:outputScript name="js/jqxgrid.sort.js" /> <h:outputScript name="js/jqxgrid.pager.js" /> <h:outputScript name="js/jqxgrid.selection.js" /> <h:outputScript name="js/jqxgrid.edit.js" /> <h:outputScript target="body"> $(document).ready(function() { var source = { datatype: "json", datafields: [{ name: 'firstName', type: 'string' }, { name: 'lastName', type: 'string' }, { name: 'title', type: 'string' }, { name: 'birthDate', type: 'date' }], id: 'EmployeeID', localdata: '#{employeeController.employeesString}' }; var dataAdapter = new $.jqx.dataAdapter(source); $('#jqxgrid').jqxGrid({ theme: 'arctic', width: 550, autoheight: true, source: dataAdapter, columns: [{ text: 'First Name', datafield: 'firstName', width: 100 }, { text: 'Last Name', datafield: 'lastName', width: 100 }, { text: 'Title', datafield: 'title', width: 180 }, { text: 'Birth Date', datafield: 'birthDate', cellsformat: 'd', align: 'right', cellsalign: 'right' }] }); }); </h:outputScript></h:head><h:body> <div id="jqxgrid"></div></h:body></html>
7. Run the Grid Page
Before running the View, please make sure you have the Apache Tomcat server installed and configured as explained in Steps 5 and 6 from the tutorial Configure MySQL, Eclipse and Tomcat for Use with jQWidgets.
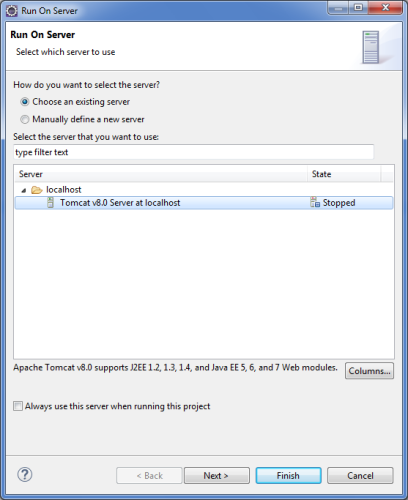
Right-click the project and select Run As → Run on Server. In the window that appears, select Tomcat v8.0 Server at localhost and click Finish.
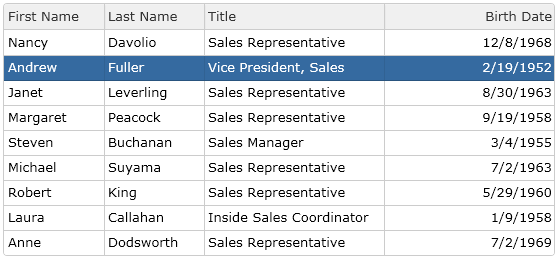
Go to http://localhost:8080/jqwidgets-faces/grid.xhtml to view the grid page: