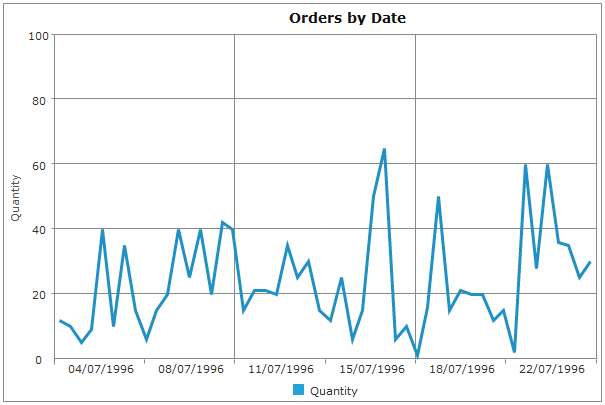
Bind jqxChart to SQL Database using ASP .NET MVC3
If you haven't already installed ASP.NET MVC 3 use this resource: http://www.asp.net/mvc/mvc3
For this tutorial you're also going to need the Entity Framework: http://www.microsoft.com/download/en/details.aspx?id=18504
For our purpose we will use the Northwind database which you can download from here. So let's begin!
Create new ASP.NET MVC 3 project and choose the "Empty project" option for template. For "View engine" select "Razor".

- You have to load the database. Drag the files: "NORTHWND.LDF" and "NORTHWND.MDF" and drop them over the "App_Data" directory in your project. If there's no "App_Data" folder then right click on the white space in the "Solution Explorer" choose "Add -> Add ASP.NET Folder -> App_Data". *Note: To find your connection string, open the Server Explorer, click on the NORTHWIND.MDF under the Data Connections node, and the Connection String will be visible in the Properties Window.
- Expand the "View" directory after that the "Shared" and double click on "_Layout.cshtml". Add the following code in your "_Layout.cshtml":
<!DOCTYPE html>
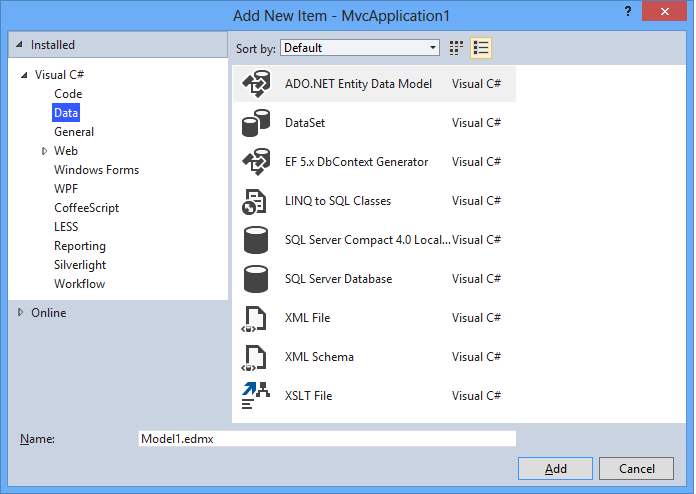
<html><head><meta charset="utf-8" /><title>@ViewBag.Title</title><link href="@Url.Content("~/Content/Site.css")" rel="stylesheet" type="text/css" /><script src="http://jqwidgets.com/jquery-widgets-demo/scripts/jquery-1.11.1.min.js" type="text/javascript"></script><link href="http://jqwidgets.com/jquery-widgets-demo/jqwidgets/styles/jqx.base.css" rel="stylesheet" type="text/css" /><script src="http://jqwidgets.com/jquery-widgets-demo/jqwidgets/jqx-all.js" type="text/javascript"></script></head><body>@RenderBody()</body></html> - In the next step we're going to create our Models. Now right click on the "Models" folder. Select "Add -> New Item". Choose "Data" from the tree view in left. Select "ADO.NET Entity Data Model" and click "Add".
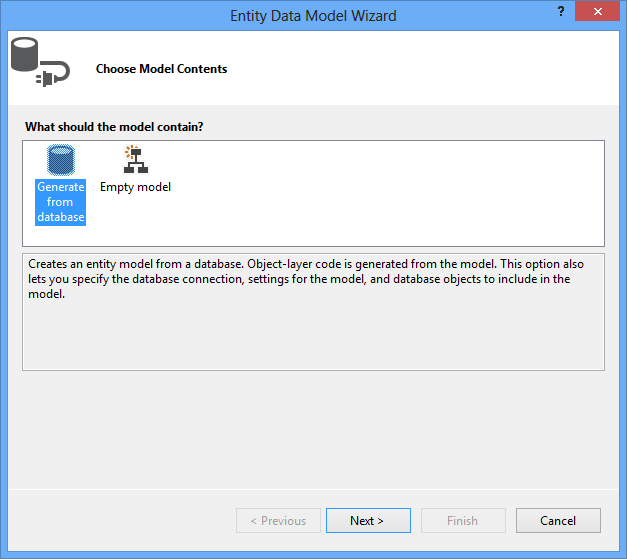
In the "Choose Model Contents" section select "Generate from database" and click Next.
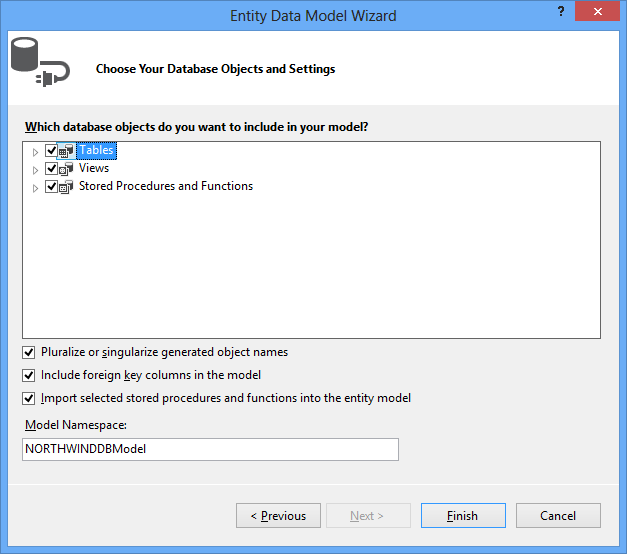
In the "Choose Your Data Connection" section click next. The the next section ("Choose Your Database Objects") check the "Tables" and "Stored Procedures" checkboxes and click "Finish".
- For our purpose we are going to use the "Orders" table. To add entity objects and DbContext you have to expand the Models directory. Double click on "Model1.edmx". In the diagram appeared, right click on the white space and choose "Add Code Generation Item". In the tree view in left, select "Code", choose "ADO.NET DbContext Generator" and click "Add".
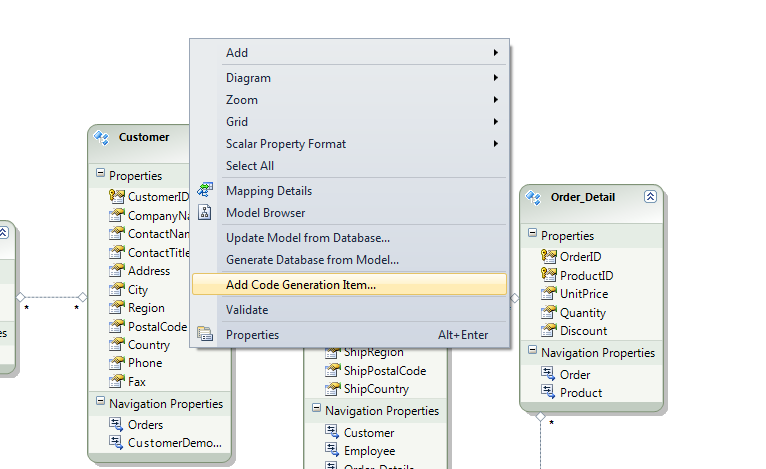
- After that press F6 to Build your project.
- Now we are ready to add our Controller. Right click on the "Controller" folder and after that choose "Add -> Controller". Rename it "OrdersController". The choosen template should be "Controller with read/write actions and views, using Entity Framework". For Model class select "Order (Project.Models)" and for Data context class "NORTHWNDEntities2 (Project.Models)" after that choose "Add".

- After the generation of the controller have been completed go to the "Controllers" folder and double click on "OrdersController.cs". Add the following method after the "Index" method:
using System;
using System.Collections.Generic;using System.Data;using System.Data.Entity;using System.Linq;using System.Web;using System.Web.Mvc;using Project.Models;namespace Project.Controllers{public class OrdersController : Controller{private NORTHWNDEntities db = new NORTHWNDEntities();//// GET: /Orders/public ViewResult Index(){var orders = db.Orders.Include(o => o.Customer).Include(o => o.Employee).Include(o => o.Shipper);return View(orders.ToList());}public JsonResult GetOrders(){var orders = db.Orders.ToList<Order>();var orderDetails = db.Order_Details.ToList<Order_Detail>();var products = db.Products.ToList<Product>();var result = (from d in orderDetailsjoin o in orders on d.OrderID equals o.OrderIDjoin p in products on d.ProductID equals p.ProductIDselect new { o.OrderDate, d.Quantity, p.ProductName }).Take(50);return Json(result, JsonRequestBehavior.AllowGet);}//// GET: /Orders/Details/5public ViewResult Details(int id){Order order = db.Orders.Find(id);return View(order);}//// GET: /Orders/Createpublic ActionResult Create(){ViewBag.CustomerID = new SelectList(db.Customers, "CustomerID", "CompanyName");ViewBag.EmployeeID = new SelectList(db.Employees, "EmployeeID", "LastName");ViewBag.ShipVia = new SelectList(db.Shippers, "ShipperID", "CompanyName");return View();}//// POST: /Orders/Create[HttpPost]public ActionResult Create(Order order){if (ModelState.IsValid){db.Orders.Add(order);db.SaveChanges();return RedirectToAction("Index");}ViewBag.CustomerID = new SelectList(db.Customers, "CustomerID", "CompanyName", order.CustomerID);ViewBag.EmployeeID = new SelectList(db.Employees, "EmployeeID", "LastName", order.EmployeeID);ViewBag.ShipVia = new SelectList(db.Shippers, "ShipperID", "CompanyName", order.ShipVia);return View(order);}//// GET: /Orders/Edit/5public ActionResult Edit(int id){Order order = db.Orders.Find(id);ViewBag.CustomerID = new SelectList(db.Customers, "CustomerID", "CompanyName", order.CustomerID);ViewBag.EmployeeID = new SelectList(db.Employees, "EmployeeID", "LastName", order.EmployeeID);ViewBag.ShipVia = new SelectList(db.Shippers, "ShipperID", "CompanyName", order.ShipVia);return View(order);}//// POST: /Orders/Edit/5[HttpPost]public ActionResult Edit(Order order){if (ModelState.IsValid){db.Entry(order).State = EntityState.Modified;db.SaveChanges();return RedirectToAction("Index");}ViewBag.CustomerID = new SelectList(db.Customers, "CustomerID", "CompanyName", order.CustomerID);ViewBag.EmployeeID = new SelectList(db.Employees, "EmployeeID", "LastName", order.EmployeeID);ViewBag.ShipVia = new SelectList(db.Shippers, "ShipperID", "CompanyName", order.ShipVia);return View(order);}//// GET: /Orders/Delete/5public ActionResult Delete(int id){Order order = db.Orders.Find(id);return View(order);}//// POST: /Orders/Delete/5[HttpPost, ActionName("Delete")]public ActionResult DeleteConfirmed(int id){Order order = db.Orders.Find(id);db.Orders.Remove(order);db.SaveChanges();return RedirectToAction("Index");}protected override void Dispose(bool disposing){db.Dispose();base.Dispose(disposing);}}} - After that go to the "Views/Orders" folder in your project. Double click on "Index.cshtml". Put there the following content:
<script type="text/javascript">
$(document).ready(function () {var source ={datatype: "json",datafields: [{ name: 'OrderDate', type: 'date' },{ name: 'Quantity' },{ name: 'ProductName' }],url: 'Orders/GetOrders'};var dataAdapter = new $.jqx.dataAdapter(source,{autoBind: true,async: false,downloadComplete: function () { },loadComplete: function () { },loadError: function () { }});// prepare jqxChart settingsvar settings = {title: "Orders by Date",showLegend: true,padding: { left: 5, top: 5, right: 40, bottom: 5 },titlePadding: { left: 90, top: 0, right: 0, bottom: 10 },source: dataAdapter,categoryAxis:{text: 'Category Axis',textRotationAngle: 0,dataField: 'OrderDate',formatFunction: function (jsonDate) {return $.jqx.dataFormat.formatdate(jsonDate, "MM-yyyy");},showTickMarks: true,tickMarksInterval: 10,tickMarksColor: '#888888',unitInterval: 10,showGridLines: true,gridLinesInterval: 10,gridLinesColor: '#888888',axisSize: 'auto'},colorScheme: 'scheme05',seriesGroups:[{type: 'line',valueAxis:{description: 'Quantity',axisSize: 'auto',tickMarksColor: '#888888',unitInterval: 20,minValue: 0,maxValue: 100},series: [{ dataField: 'Quantity', displayText: 'Quantity' }]}]};$('#jqxChart').jqxChart(settings);});</script><div id="jqxChart" style="width: 600px; height: 400px;"></div> - In the last step expand "Global.asax" and double click on "Global.asax.cs". Change the "RegisterRoutes" method to look like this:
public static void RegisterRoutes(RouteCollection routes)
{routes.IgnoreRoute("{resource}.axd/{*pathInfo}");routes.MapRoute("Orders", // Route name"{controller}/{action}/{id}", // URL with parametersnew { controller = "Orders", action = "Index", id = UrlParameter.Optional } // Parameter defaults);} - Press F5 to run the project.
Press F5 and see the result:
